Pages

Tuesday, June 28, 2011

Half Apron

I went to a bridal shower this past weekend and wanted to make something crafty for her gift. I decided to rummage through my intense fabric stash to see what I could do. And my fabric stash and I came up with this little beauty.


It was so fun to make. The original dimensions of the green/white checker fabric was 18" X 24" which gives plenty of coverage to save those pants from messes in the kitchen. I decided on a removable flower clip rather than a pocket because I never use pockets in aprons. The flower originally was a ruffle that was going to go along the front edge of the apron, but I wasn't crazy with how it looked when I positioned it there. I am very pleased with the little flower.


I forgot to include a photo of the ties. I used 7/8" hot pink grosgrain ribbon for the two ties. I like the way ribbon looks for ties and it saves so much time compared to making fabric ties.


My favorite part about this finished product is that it looks finished! I was precise with all my stitches and hems and in the one place on the under side that there is a raw edge, I did a tight zigzag stitch to give it a serged-edge look (Someday. maybe I'll have a serger of my very own!). 
I like it when my home-made creations look more professional. 
Try one yourself. And if you would like any more details of how I made this apron and flower, let me know and I can share. 

~ Chelsea ~

Saturday, June 25, 2011

Nesting Theme Baby Shower

As promised, here are some photos from the baby shower my mom and I put together for Crystal a few weeks ago. We used a few coordinating fabrics to make birds, a banner and the table runner and cloths. It was fun and it turned out lovely.


These dangling birds were made using my Silhouette machine, but can be made without one too. I used the clean cut fabric interfacing, cut out the basic bird shapes and wings in contrasting colors. They are double sided, with a little batting in between. I ironed on the wings and around the edges and the interfacing adheres them together with the heat.  Easy and cute. 


~ Chelsea ~

Tuesday, June 14, 2011

99 Cent stores

Decorating on a budget? Check out your local 99 cent or dollar stores for little bits of decorations that may just need a little tweak of color or added beauty to make them work for your theme. 

We'll be posting soon about some fun baby shower decorations that we made and used this past weekend. Here are three accents that were added to the "Nesting" theme, found at the 99 cent only store and simply spray-painted white.  

Before:


After:

As promised, there are more baby shower decoration ideas to come!

~ Chelsea ~

Wednesday, June 8, 2011

Preparing to PAINT!


Hello Everyone!
I hope your summer is full of happiness with the many simple things that life gives to bless you with!

I found some great videos from Lowes that shows instructions on painting. The videos show how to paint cabinets. Painting wood furniture is pretty much the same process, so, I thought you might like to see it step by step.

There are a couple of things that I do different than the folks at Lowes ~ I use diluted Dawn dish washing liquid to clean any grease & grime off of the piece I am about to paint. Also, I often use a wide foam brush to apply paint when we aren't using the sprayer.

Here is the link to get you on the Lowes video site~ Then look for the video "How to prep for painting cabinets".
http://www.lowes.com/cd_Lowes+Video+Center_94400869_?ytID=oxOJbS-1AiM
Happy Painting! ~*~Lynda~*~

Tuesday, June 7, 2011

~Amazing Armoire~

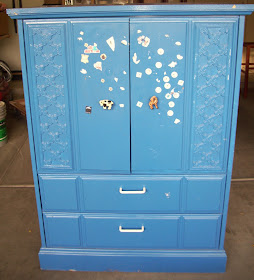
I found this armoire at a yard sale! Woo Hoo! The bright blue was pretty, but unfortunately a child went sticker crazy on the doors. It took some muscle & GooGone to get them all off.

This is what I decided to transform it into. I know, it looks like the same finish I gave some previous projects. Off-white satin paint, gray glaze & clear lacquer finish. It's a winner for sales. I had 3 buyers 20 minutes after posting it on Craigslist.
I was reminded when glazing that when the temperature warms up the glaze dries very fast. I actually didn't want the 2 bottom drawers that dark, but the temperature was warmer (92 in the shade) when I glazed the drawers than when I did the rest of the armoire. I will need to remember this because summer is just starting & I live in the valley of the sun.
I left the inside un-glazed, but sprayed it with the clear lacquer to give it a nice hard finish. I also painted the hinges with black enamel. It makes them look clean and new.

Now for the big surprise! This beautiful piece of furniture is made completely of particle board and pressed woods. It is made by the Colony Furniture Company. It seems like better quality than IKEA.

The detail on the front of the doors is really the reason why I bought this armoire! I knew that would look amazing glazed!

I painted the pulls two colors. They were gold. After preparation, I painted a coat of oil-rubbed bronze and then 2 fine coats of black enamel. I really like giving interest to the metal by letting a little bronze show through, but when you look at the pulls you mostly see black.

And here is a close-up of one of the knobs. I love all of the detail in them.

TTFN ~*~Lynda~*~