Pages

Tuesday, June 25, 2013

Celebrate America!

I'm feeling extra patriotic this year and I'm very excited for Independence Day next week.
I've been trying to come up with a decoration for my front door. I looked around the craft store and some of my favorite crafty blogs for inspiration, but I didn't see anything that I had time for or already had at least most of the materials for. I really should be banned from buying any additional crafty supplies until after I use what I have! 
So, I decided to use a scrap of bead board from my recent kitchen project, a contact paper stencil created by me and my Silhouette machine, paint and a strip of fabric that I had in my stashes.
Here's what I came up with:


Have I ever said that I love bead board!?
I do. 
And I also love my country and I pray that God can continue to be the leader of it as we allow Him.

~ Chelsea ~

Tuesday, June 18, 2013

Cabinet Painting is DONE!

A week of intense work on my kitchen has finally qualified this project to be labeled as "done"! I am so grateful for all the people that helped me complete this project. 

If you missed the before story of my kitchen cabinets, check it out HERE.

I've heard before that the best way to get a home project done is to plan a party to be at your house. I used my daughter's 4th birthday party as my deadline and there were moments when I didn't think I could pull that off. My dad hung the last cabinet doors just minutes before the first guests arrived!


My FAVORITE part:


Just a few small additional touches left like:
- knobs on top doors, handles on lower doors and drawers
- paint above cabinets and sink area light yellow
- spray paint stove hood black
- caulk and touch up a few doors
- painting/covering underside of upper cabinets that can be seen from our family room
- new dark granite-looking laminate counter tops in the future
- Maybe someday I'll get new matching appliances (wish)


My advice for anyone starting a similar kitchen painting project:
- Expect it to take longer than you expect. :)
- Take time to prepare before painting (deep cleaning, caulking cracks, Spackle holes, light sanding for a smooth surface).
- Don't get discouraged during the priming stage. It always looks worse before it looks better.
- Accept help with painting and/or child care.

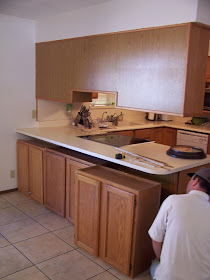
So here's BEFORE:


And AFTER:


~ Chelsea ~

Monday, June 10, 2013

Kitchen Cabinets - Making Progess!


I'm getting excited as my kitchen cabinet project begins again after a long break. Let me fill you in on the story of my kitchen cabinets. 

Beginning of December 2012, I aqcuired some cabinets that would fill a vision I have had for the dining room side of my kitchen. I never liked looking at the bare back side of the kitchen cabinets, and I thought it would be great to have additional cabinet space in this area. My dad helped that vision come true by installing the cabinets after much preparation, measuring and spacing. 


As you can see, the process of installing these extra cabinets was far from simple. It required demolition, supports in the attic/crawl space, drywall repair, spacing between the upper cabinets, creation of a toe-kick riser for the lower cabinets and much energy and time. I was immediately in love with my new cabinets, although, they have sat looking un-finished for nearly half a year.

Here's a view of the kitchen a few months back.


And the unfinished ends that have been staring at us for too long...


I primed and painted the top new cabinets back in March, but they are still in need of a final coat. The others have been waiting...
...until this past Saturday when we caught the vision again!

I began on Friday deep cleaning all the cabinets with TSP and taking off the cabinet doors on the top (since my little girls would be around I didn't want the bottom ones off).
Then Saturday morning, I primed the "bones" of the top cabinets and the trim.
I used both brush and small roller.

Here's a photo of the priming process...


And here's that hideous end, waiting for my favorite part!!!


Bead Board!!!


I'm so happy with how the bead board looks, even un-finished. 
This week I'm hoping to wrap up this kitchen project!

- Spackling, light touch-up sanding and caulking today.
- Full day of priming and painting tomorrow (grandma is taking the girls, hooray!).
- Replacing all the doors and drawers.
- Putting new bumpers on the insides of doors and drawers.
- I'm hoping to find a great deal on some hardware to give a finishing touch.

I'm looking forward to seeing the fruit of the labors of many, especially my dad, in this kitchen project!

Wednesday, June 5, 2013

Painting Frames

There is no better way to surround a photo or give a gift than to save money and use your own time and talents to recreate beauty. A thrift store frame plus a little time and creativity (and paint) makes a unique, original gift and a frame just the way you want it. 
I painted this frame for my mum this past Mother's Day. 
I almost forgot the before picture. 


Light blue first:


Then I used a wet paper towel to add some white paint. I rubbed it on and then rubbed it off hard to give it a white-washed, slightly distressed look. 


I got the frame nearly free at a thrift store, then chose I color of paint from my stash that I thought she would like. It looked great with a photo of her four children in it, taken by my sister.

Save money and have fun recreating a frame from a thrift store!

~ Chelsea ~