I love aprons, although I honestly never remember to wear one when I am cooking or baking. It's silly because then I get upset when my clothes have oils stains.
I really enjoy making aprons for little people, I guess because little things are always that much cuter. And, kids love helping in the kitchen, or playing pretend kitchen and an apron just makes it that much more fun.
I made this apron for a friend. I made it reversible and with a cute little ruffle. It can be made in any size your heart desires. For a toddler-sized apron, you need about 3/4 yard of each coordinating fabric and some 7/8" wide grosgrain ribbon.
Here's how I did it:
First, I cut out 2 coordinating fabrics into the desired apron shape and size, including an extra inch or so for seam allowance. One nice thing about an apron is that it doesn't have to fit just right. When I cut out the apron shape, I have both the solid pink and the pattern fabrics together and folded in half and I cut with the apron center on the fold to get the apron perfectly symetrical.
Here are my 2 pieces of fabric, cut identical using a rotary cutter (wonderful invention!).
Then, decide if you want pockets or some shape on your apron. I chose to put hearts of the opposite fabric on the front and back. One on the chest section and the other where a pocket might be. I drew out my heart on a piece of paper and used that as a pattern to cut out my two fabric hearts. Then, I pinned them on the right sides of each apron piece in place where I wanted them and sewed a tight zig-zag stitch around the edges to secure them.
Ok, on to the ruffle...
Cut out long strips of each fabric, mine needed to be 57" inches by 2.5" inches each. I needed to sew shorter strips together to make 57" strips because of how short my cut of fabric was.
Then, sew with right sides together along one long side and both short sides to form the seam for the outer side of the ruffle. Then, turn it right sides out and square the 2 corners using something pointy, like a pencil. Iron flat.
Then, do a basting stitch (increase stitch length) about 1/4 inch from the raw edges and pull one thread to gather the ruffle evenly and just enough to be the correct length to match up with the bottom of your apron.
If you need help with gathering, check out this tutorial.
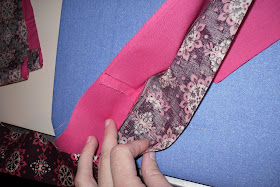
Then, lay out the ruffle, matching the raw edges of the apron pieces and the ruffle. Pin in place (Don't skimp out on pins, use a bunch to keep it all in place). ***Leave about 1/2 inch at underarm corners open, allowing room for the underarm seams. Apron pieces need to be right sides together with the ruffle laying with opposite fabric patterns touching. In my case, the solid pink fabric against patterned purple fabric, as shown in the photo below.
Once it is all pinned, cut your grosgrain ribbon to make your 2 straps to tie in the back. Then, you will need to pin those 1/2 inch below the underarm corner (where the ruffle begins) facing into the apron body on both sides. Then, sew with a 1/2 inch seam allowance around the bottom of the apron, being sure to align the ruffle inside as you go.
Then, pin the neck strap facing inward and sew along the top of the apron and along one underarm section. Leave the other underarm section for turning right side out. Turn the apron right side out and make sure the ruffle, neck strap and back ties are all sewn in correctly.
Fold under the last underarm seam, iron flat and topstitch around the entire border
I hope this tutorial was helpful!
~ Chelsea ~
~ Chelsea ~


So ADORABLE! I love the fabrics that you chose.
ReplyDeleteBeautiful and thanks for the tutorial! I’m off to make one now!
ReplyDelete