Pages

Friday, December 23, 2011

Simple Christmas Tree Ornament

My mom made this beautiful ornament for my tree this year. 


She used the metal top of a frozen juice concentrate container, painted it, drilled a hole and added the ribbon hanger and the silhouette nativity. I used my Silhouette machine (craft cutter) to cut the white contact paper into the detailed nativity shape. 
Contact paper is a great (and cheap) alternative to using vinyl for many projects when using a craft cutter. 
This ornament is simple and a great reminder of who we are celebrating!


Merry Christmas!

~ Chelsea ~

Monday, December 19, 2011

Merry Christmas To All

I really love the Christmas season! Everything about it is joyous!We have had this nativity profile for many years. Rod, my Handy Honey, simply cut it out of plywood, made some legs on the back to hold it up and I painted it white. It has it's own spotlight, because after all, Christ's birth is the best part of Christmas. Above is Chelsea's lovely Christmas tree. Her awesome little helper rearranges it once in awhile! The beaded pears & apples are some items that we used at her wedding reception so, they are extra special.

Our Christmas tree has so many ornaments that I don't even put them all on. Years ago I used to have 2 trees, one for the kids to decorate (which I always loved) and a fancy one that coordinated with the living room colors. Almost every year I buy or make an ornament that has the nativity on it. I make sure to place them on the lower half of the tree so our Grandcuties can see them and remember what Christmas is really all about.

Living in this smaller home I don't have as many places to decorate, but our antique buffet is a great place for all kinds of arrangements.

I love clear glazed ceramics with their off-white color. I have made some years ago with the help of Rod's Grandmother, but this pretty piece of Joseph, Mary, and Jesus came from a thrift store!

One more picture of the front of our home with the beautiful white lights!

With Love, Lynda

Thursday, December 15, 2011

Baby Room

Slowly I am getting decorations gathered and made for my new little baby girl's room.

This fabric inspired the colors and theme of the room. I got this little piece of flannel fabric in the remnant section at Joann's a long time ago and unfortunately, it is no longer available. With the help and instruction of a good friend, I crocheted the edging around the fabric to make it a little blanket.
I love the deep and bright colors.


So, all the colors in this blanket will be included in the decorations for the room.

My mom, Lynda, made a vibrant picture frame mat and gave it to us with a beautiful white frame to include in the baby room decor. 


I love how it looks! And it is incredible to note that all the great pinks and oranges came from a variety of ads that my mom collected. She cut them out to perfectly cover the mat and then mod-podged over it all for a smooth final coat. 
I made the simple "I am a Child of God" center.

Once I get all the wall decorations made and up, I'll be sure to post how it all comes together.

~ Chelsea ~

Monday, November 28, 2011

Wood Christmas Decorations

I love Christmas. I love decorating for Christmas and having those decorations all around for at least a month to remind me that it is Christmas time.

I don't have a fireplace with a beautiful mantel to display our family's stockings, but I have always desired a cute way to hang them so I can see them throughout the season.
With some inspiration from Crystal's awesome wooden signs that she sold at the boutique, I created a wooden stocking hanger.


I am very pleased with the simplicity of my creation and how well it looks with our mis-matched stockings. I actually really like the fact that none of our stockings are the same. Mine and my husbands are from our growing up years and I made my two daughters stockings. (The most recently made one shown here.)


It's amazing what some scrap lumber, paint and small screw-in hooks can create.

While I was at it, I made a few decorative signs in the same wonderful red color.
I used my Silhouette machine to cut out white contact paper to create the letters and shapes.


Easy, cheap and beautiful. Just how I love it.

I hope you are enjoying decorating for Christmas too!

~ Chelsea ~

Monday, November 21, 2011

The Boutique Was So Fun!

Last Friday evening the girls & I shared in the fun at a Holiday Boutique hosted at a friends gorgeous home.We set up in a space along with 2 other awesome gals, which added to the fun!
Most of my items where done in the French Country/Cottage style along with some antique & vintage decor.

The ever so adorable Chelsea & Crystal with baby "M"

Chelsea made these creative magnet boards with super cute magnets. She also made some awesome chalkboards, but I didn't get a picture of them.

Crystal made the wonderful wood placques with sayings on them that get you thinking! She should have made a lot more of the one with the big heart that says love on the bottom. It sold before the boutique even started.

I had a ton of fun making home decor out of random and sometimes unique materials. My Handy Honey was a huge help for me. He made the white table that I displayed all of our goodies on, the 2 black corner shelves, 2 small table display risers, the spindle decor, cut beadboard & concrete board for me & etc.

We didn't really make a ton of money for all of the time & work that we put into it,

but it was a ton fun!
I wish you could hear the laughter that Jess was getting "M" to make!


~*~ Lynda ~*~

Wednesday, November 16, 2011

Cardboard Easels

There are many times when I am in need of several easels for various displays that I create for church or other projects. This time, I was in need of easels for my boutique display and I wasn't interested in spending money on them. I have a few nice easels around my house, but I needed several. 

So, that's where the newly purchased fire pit comes in... at least the box it came in. 

I used the thick sturdy cardboard corners to cut out (very carefully with a box/exacto knife) 5 easels. 
The first one, I sketched on with a pencil and just guessed the size and shape. Then, when that one amazingly worked, I used it as a template to trace and cut out the others.


Then, I painted the cardboard with 2 light coats of spray paint. 


Wah-lah! 5 perfectly stable and completely FREE easels to help me display my magnetboards and chalkboards on Friday


~ Chelsea ~

Monday, November 14, 2011

Some more awesome Home Decor!

I love how this mirror painted up! Creamy white w/gray glaze. Still French provincial looking in shape, but French Country style with the new colors. You can tell that this mirror is very old. We picked it up at an antique store in Utah.

This framed metal hook looks better in person. I still have a very hard time taking pictures of black items.

I like it when home decor also serves a purpose, such as this great 3 pronged hook.

This is a really wonderful repurpose of an old fireplace screen! It can be used sitting on a desk or table (I hung some jewelry on it) and/or it looks really great hanging on the wall as a headboard for a double or twin size bed!
All of these items will be for sale at the Holiday Boutique this Friday
~*~Lynda~*~


Monday, November 7, 2011

Adorable Rocking Chair

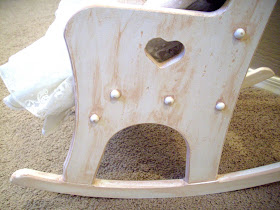
Here is an awesome solid wood, beat up little rocking chair! And here it is after some white paint and pale pinkish glaze! Doesn't it look great all distressed & glazed?

The side view is adorable too!

By the way, I painted those 3 flower wall dowels with the same finish.

Yes, they will be available for purchase at the boutique on Friday, Nov. 18th!

~*~Lynda~*~


Boutique Sneak Peaks

Here are a few of the magnet boards and chalkboards that I will have for sale at the boutique on November 18th. I am loving making these and am excited to sell them!

I made the chalk and magnet boards in a variety of hanging styles; ribbon hang, magnetic to secure to a fridge or nail hanger located on the back. 


And also some play magnet boards for fun and learning:


There are many different styles, colors and shapes and I will also have a variety of homemade magnets to see as well.

~ Chelsea ~


Friday, November 4, 2011

Refinished Table and Chairs

This little table and chairs set took me WAY too long to complete. But, I guess I have my excuses and I won't burden you with them. I'm just thrilled to have this set fixed up and beautified and sold! 

Before:


After:


After many hours of sanding, cleaning, gluing, clamping, patching, filling and painting, this table set and I should be really good friends. :)
I think it was worth the effort to give this yard-sale find a new life. 

~ Chelsea ~

Tuesday, November 1, 2011

Holiday Boutique!

We're looking forward to being a part of a
Holiday Boutique coming up on
November 18th!

4:00pm - 9:00pm Come and Go
17422 E. Brooks Farm Rd. Gilbert, AZ 85298
VIEW MAP

Here are some of the goodies that you can expect at this boutique!

Hair Accessories
Chunky Necklaces
Baby Blankets and Accessories
French Country/Cottage Decor
Chalk Boards and Magnet Boards
Crocheted Hats
Fudge and Toffee
Metal and Wood Furniture and Decor
Table Runners
Christmas Stockings
Gilbert Temple Prints
Crocheted Dish Scrubbers
Greeting Cards
Picture Frames
Onesy Dresses and Shoes
Fresh Salsa
Wooden Plaques
Fall Decor
Mary Kay Makeup
Gold Canyon Candles
Perfectly Picked Purses & Dance Bags
15-minute massages
Facial Waxing
Glitter Toes

We hope you'll come join us for yummy refreshments and a fun night out!


Sneak peaks of items we will have at the boutique:
Adorable Bench
Louver Doors
Wall Decor
Magnet boards
Little Rocking Chair

Monday, October 31, 2011

2 more Pretty Items for the Boutique!

Here is a lovely painting of a woman or is it a man???? Anyway, I loved all of the style going on with the frame, so, I bought it from a really awesome gal!

Here it is all changed up & BEAUTIFUL!
And here is a very lovely necklace holder! I can see this holding some super pretty chunky necklaces too!
~*~ Lynda ~*~


More about the Boutique coming up HERE!

Saturday, October 29, 2011

Louver Doors Make Great Home Decor!

I love how this decorator used these old louver doors in her living room!

Doors can be used in many different ways. Placed behind a desk, credenza, foyer table, bed (headboard) & etc are all really great looks!


Here are some old and crusty louver doors that I picked up super cheap (free)! I decided to paint them the same colors in case someone wanted to buy both of them. One side is painted antique white and the other side is painted dove gray. The knobs can be on either side and the hook on the top can have items hanging on either side too!

I made a couple of pretty small wreaths to add some flare!


Here is a picture of the other side painted in a beautiful shade of gray.


The other wreath hanging so beautifully with it's ribbons and flowers!


Take a look at the gorgeous porcelain floral knob!
These pretty doors will be for sale at our Holiday Boutique on Nov. 18th!


~*~Lynda~*~