Hello, welcome to Homemade Home, where we share our ideas for decorating, crafting, sewing, and using a little creativity to save some dough!

Monday, February 7, 2011

Improvement is a GREAT THING!

Over the past 2 years I have been so pleased to find these
wonderful folding table & chairs from 3 different second hand stores.

The chairs are made by the 'Stackmore' furniture company.
I would love to find 2 more of these awesome chairs.


They are perfect to use when our Grandcuties are here.
Thus the dark brown upholstery!


Look at this beautiful 'Drexel Heritage' dining room set.
Unfortunately its previous owners were very rough on it
and so, it needed a face lift.


It was actually a little hard to paint over such beautiful pecan
& exotic burl wood. But it just had to be.


Pretty, huh!


This dresser was fun to transform. I usually wouldn't waste my
time on such a piece (particle board), but it still functioned well,
the chuncky handles appealed to me and it had some good lines.


Sweet "Ballet Slipper Pink" with Brown glaze.
The pulls painted up well with Oil-Rubbed Bronze.


I decided to paper the top instead of replace with a new piece of wood.
It's so PRETTY now! ~*~Lynda~*~


Friday, February 4, 2011

Attacking the Laundry Room

I don't know about you, but I find laundry to be one of the most challenging chores to keep up on. I decided I really needed to do myself a favor and make it a little smoother by organizing  my oh-so-messy laundry room. Before it had basically been a catch-all room with things that belonged in every other room of the house. It's a room we also use for home maintenance items such as light bulbs, but we could never find what we needed and would end up buying more. It was a mess and because of this, my laundry life was harder. One of the worst issues I had was not having proper places for the things. For an example, I would sometimes find that a wet laundry item (like a rag or washcloth) had been thrown in with all of our clothes making them damp, dingy, and stinky. Damp and dingy is bad, but I absolutely despise stinky. I knew I needed to put things into categories that worked and I especially needed a spot designated for wet laundry. So that is what I did.
-First I figured out what needed to go in other rooms and put those items away.
-Second I took what I wanted to keep in the laundry room and put them into categories
-Third I hit up my local dollar store and bought enough buckets to have one for each category
-Then I made labels so that the other people in my home could follow my organizational plan, thus maintaining the order I worked so hard to create
-After that, I put the items in the appropriate buckets and arranged them with items I use most often in the most convenient places.
-Lastly, I cleared larger clutter by mounting things such as the ironing board and brooms/mops onto the walls and cleaned my appliances and floor really well.
I love having an organized laundry room. I still don't always keep up on laundry, but it is definitely less discouraging with a clean and orderly place to work.

<3 Crystal

Before:


After:


Wednesday, February 2, 2011

Ugly Bathroom

My house was built in 1960 and it shows, mostly in the 2 bathrooms. Those rooms have had the least attention when  it comes to renovation and updating. With that said, my master bathroom is not a designer's paradise in the least, but after I moved here, I really wanted to at least make that small space slightly more pleasing to the eye.

First, I listed all the upgrades and things I want for the bathroom.
That list included:

1) REDO shower completely (has original pink tile)
2) Purchase new mirror and medicine cabinet
3) New door and trim
4) paint walls
5) remove 2 handicap handles and rails from the walls and patch HUGE holes
6) remove the towel bar hanging over the sink (bad placement).
7) New towel hangers
8) Paint sprinkler system box white to "blend in" (yes, the green auto sprinkler box is in our bathroom and is ugly).
9) Buy a brown bathroom rug

Then, I crossed out the things I couldn't afford right now (#1, 2 and 3) and figured out what I already have to make as much of these items come to life. I already had brown semi-gloss paint, so I decided to paint a brown stripe. With mom's help, we decided the stripe should be about 7 inches wide and go all around the room.

Here is my bathroom before:


It's hard to get the entire bathroom in a picture since it is so small.
After a few inexpensive fixes, painting and finishing touches, here's what we have.


Over time I will hopefully get to other things on my wish list, but for now me, my husband and our budget are all quite pleased with my efforts. :)

~ Chelsea ~

Thursday, January 27, 2011

Adorable Rocking Chair

There's something so delightful about white shabby chic style, especially when it involves an adorable little children's rocking chair. Just their size.

Solid wood Spindle Rocking Chair, Stamped "Ramsdell 450"
Yard Sale: $5.00

Before:


And after:


And with some extra cuteness and delight:


All this little beauty needed was some gluing, screwing, sanding, painting (mix of foam brush and spray paint, semi-gloss), time and patience (with all those little spindles), artistic distressing and spray lacquer finish. About 2 hours and $3 invested. And it was all so worth it. :)

~ Chelsea ~

Miss Coffee Table needed Love

Traditional style, solid wood Coffee Table
Yard Sale - $4.00

Before:

And after some love:


This coffee table needed a few things to get it looking sleek, black and full of beautiful curves. First, it needed a good sanding to remove flaking varnish and to smooth out some dents and areas where it appears a dog took out his anger (assuming that only male dogs have anger-management issues).


After the major sanding (coarse sand paper, electric sander), I secured a broken piece of a curved corner with wood glue. Then, I used wood putty to patch and reshape the previously meantioned dog-chewed leg and the curved edge as well as a few other minor cracks that I wanted smooth.


After the wood putty dried completely, I sanded by hand with fine sand paper and shaped the damaged leg and top edge as close as I could to how they should be. Then I used Spackle to smooth out finer cracks and imperfections. Followed by another hand sanding with fine sand paper.
Here are the 2 major damaged areas before and after fix up.


The legs needed some simple tightening and then came the painting! After 2 coats of black semi-gloss paint (foam brushed), I let it dry completely and then distressed, or sanded using fine sand paper, around the table top edge, just to bring out the beautiful shape.


Then, some spray lacquer finished it up.
To achieve an even coat of the lacquer on the table top, I first made strait passes with the spray both long ways and short ways. Then, I sprayed a few inches farther away from the table top in all different directions to get an even (no lines) coating.


A beautiful black coffee table with a value much higher than $4.00. It's like I did her (the table) a huge favor and it makes me happy.

~ Chelsea ~

Thursday, January 13, 2011

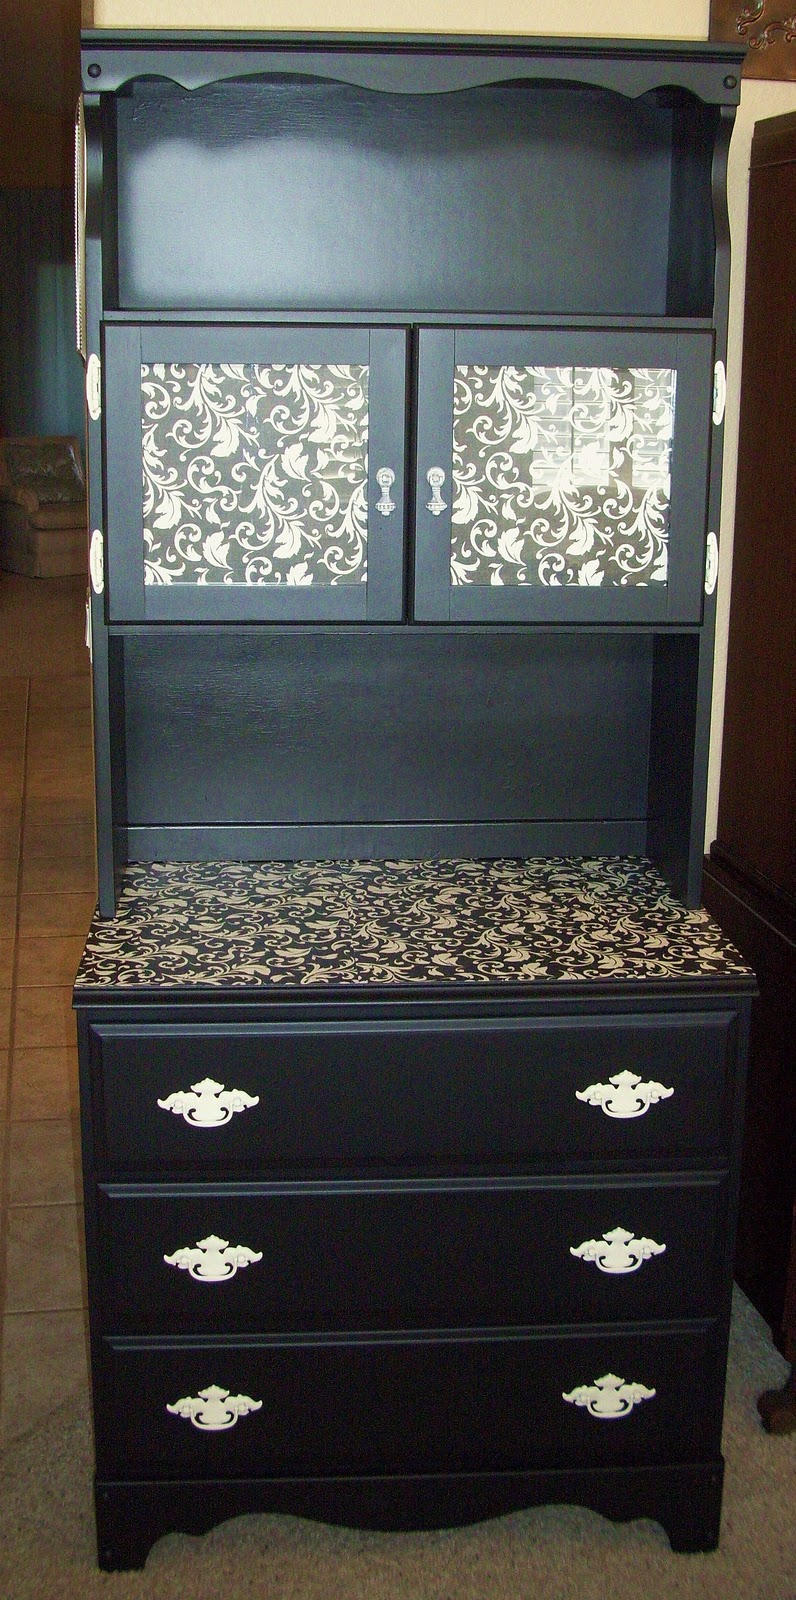
Ebony and Ivory ~ Chest of Drawers with Hutch

I found this beautiful solid wood hutch at Goodwill.
I love the aged drop pulls! It was my lucky (blessed) day ~ it was half off!
I thought it would be easy to find something to go
with it, but it actually ended up taking me 2 months to find the dresser. It's a perfect match. 


Close-up on the beautiful aged drop pulls.
 And the same drop pulls after some magic:


Sometimes I just feel like trying something different! So, I Mod Podged the paper on the top of the dresser. There are so many gorgeous papers available now! It makes it so fun!


I wasn’t really loving these handles before.


But here they are AFTER:


It's always amazing to me how paint can change and make such an improvement to something.


I Love the Look! *~*Lynda*~*

Monday, January 10, 2011

One Way To Glaze An Item.

I say one way, because I'm sure there are other ways to accomplish this beautiful look, but it's the way that I do it at this time.

First take a piece of furniture or decorative item that has some detail you want to bring out.


Next ~ lightly sand & wipe clean.
Make sure there is no grime or oils where you will be painting.


Tape off to get a nice clean line.


I buy my paint in 5 gallon quantities,
so, a nice recycled plastic container
works well for me to work from.
This time I used the soft white color to achieve the look I was going for. You can use many colors of paint under glaze.

I like to use foam brushes when painting by hand. They do not leave brush strokes in the paint. Also, I put my brushes in plastic bags while waiting to paint another coat.


Then I clean them out thoroughly with hot soapy water when I am all done.
Here is a picture of the first coat of paint. I did 2 coats of paint on this mirror. Because I desired for the brown glaze to catch in all of the nooks and crannies anyway, I did not paint those places with full coverage.


This Heavy Bodied Glaze is tricky to handle, but leaves an awesome finish!
I apply the glaze with a rag or a foam brush. Then I wipe off with a rag how ever much I want to get the look I'm going for. Both should be done in the direction of the wood grain. It sets rather quickly, so, it's nice to have a wet rag handy to wipe more glaze off if you want.


Check out my hi-tech tools ~ a cotton swab & disposable little paint brush. I use them to get the glaze in those tiny places.

I Love the Look!

Friday, January 7, 2011

Craft Niche

My parents (Lynda being one of them) are amazing for several reasons. My mom sees potential in anything and knows how to make it beautiful and functional and my dad knows how to plan, implement and create. The combination produces amazing results, such as this craft niche that they gifted to me for my last birthday.

This is what they created with a hutch, a free desk, a chair and a little extra wood for shelves and the desk top (and paint and a lot of time and work). The hutch and shelves are attached to the wall and provide so much organization space.


My mom painted and distressed all the pieces prior to bringing them over to our house. Then just a little touch-up was needed after it was all put together.


For storage organization, we painted some large aluminum cans white and covered them with some pretty paper for an additional accent of color and coordination. We glued bias tape around the top edge to cover up any sharp edge there and to make it look nice.


Here is my wonderful space more recently, filled with all the things I love to have around me when I am being crafty. I love the time I spend in my organized craft niche.


~ Chelsea ~

Night Stands

I purchased some inexpensive, solid wood night stands for my master bedroom from a friendly craigslist seller. I had plenty of hearthstone brown flat acrylic paint left from when I painted our headboard, so I wanted to make them look like they were meant for each other by painting the 2 nightstands as well.
First, I sanded to remove the glossy finish and some minor dents and scratches. I sanded by hand, because I had not yet invested in my electric sander. Then I brushed on 2 coats of brown paint and finished with a coat of spray clear coat protectant (especially important for the tabletop for dusting and protecting).

Before:


After:


I think the brown looks great and brings out the beautiful curves of this piece of furniture. Maybe someday I will update the old handles, but for now they look great right next to our bed.

~ Chelsea ~

Couch Pillows made Anew


I wanted some large couch pillows to make my little couch oh so comfy, but my budget was limited. Have you ever experienced that feeling? So, I went to a nearby thrift store and looked through their pillows for two that were the same size and shape, still had good form and firm stuffing, didn't smell yucky and looked clean. Wow, that was quite a checklist. But, even with those specifications, I found them and knew they would love their new coverings and home on my couch. So, I took them home and made them anew.

Here are my thrift store beauties:


So, recovering square pillows is quite simple. First, choose your fabric. I chose a decorator (thicker) patterned fabric for the front and a complimentary solid flanel fabric for the back. Flanel was a good choice for comfort and softness, but unfortunately not the most long-lasting because of its tendency to pill or ball up once rubbed a lot. Any sturdy fabric that you like will be great.

Measure your pillows from seam to seam to get the total after-sewn size. Then cut out your squares (or rectangles) of fabric about an inch greater for seam allowances.

Then, with right sides together, sew your back fabric to the front fabric leaving one entire side open for turning right side out and inserting the stuffed pillow. When I sewed my seams, I did 1/4 inch seams near the corners and very gradually increased to a 1/2 inch seam at the centers to create a more shapely pillow (not just a strait square).
Once you have your three sides sewn, turn it right side out and stuff in your pillow and get the points and seams aligned inside.
Then, because I was inexperienced with hand stitching when I made these pillows, I shoved the pillow as deep inside as I could and machine top stitched the last side closed with the raw edges turned in. It looks ok, but hand stitching an invisible stitch would be a better option. I have since learned how to do that thanks to this tutorial.

Now place that happy little old/new pillow on your couch or bed and give it the squishes it deserves.


~ Chelsea ~