Hello, welcome to Homemade Home, where we share our ideas for decorating, crafting, sewing, and using a little creativity to save some dough!

Thursday, February 23, 2012

Little Touches For Our Guest Bathroom.

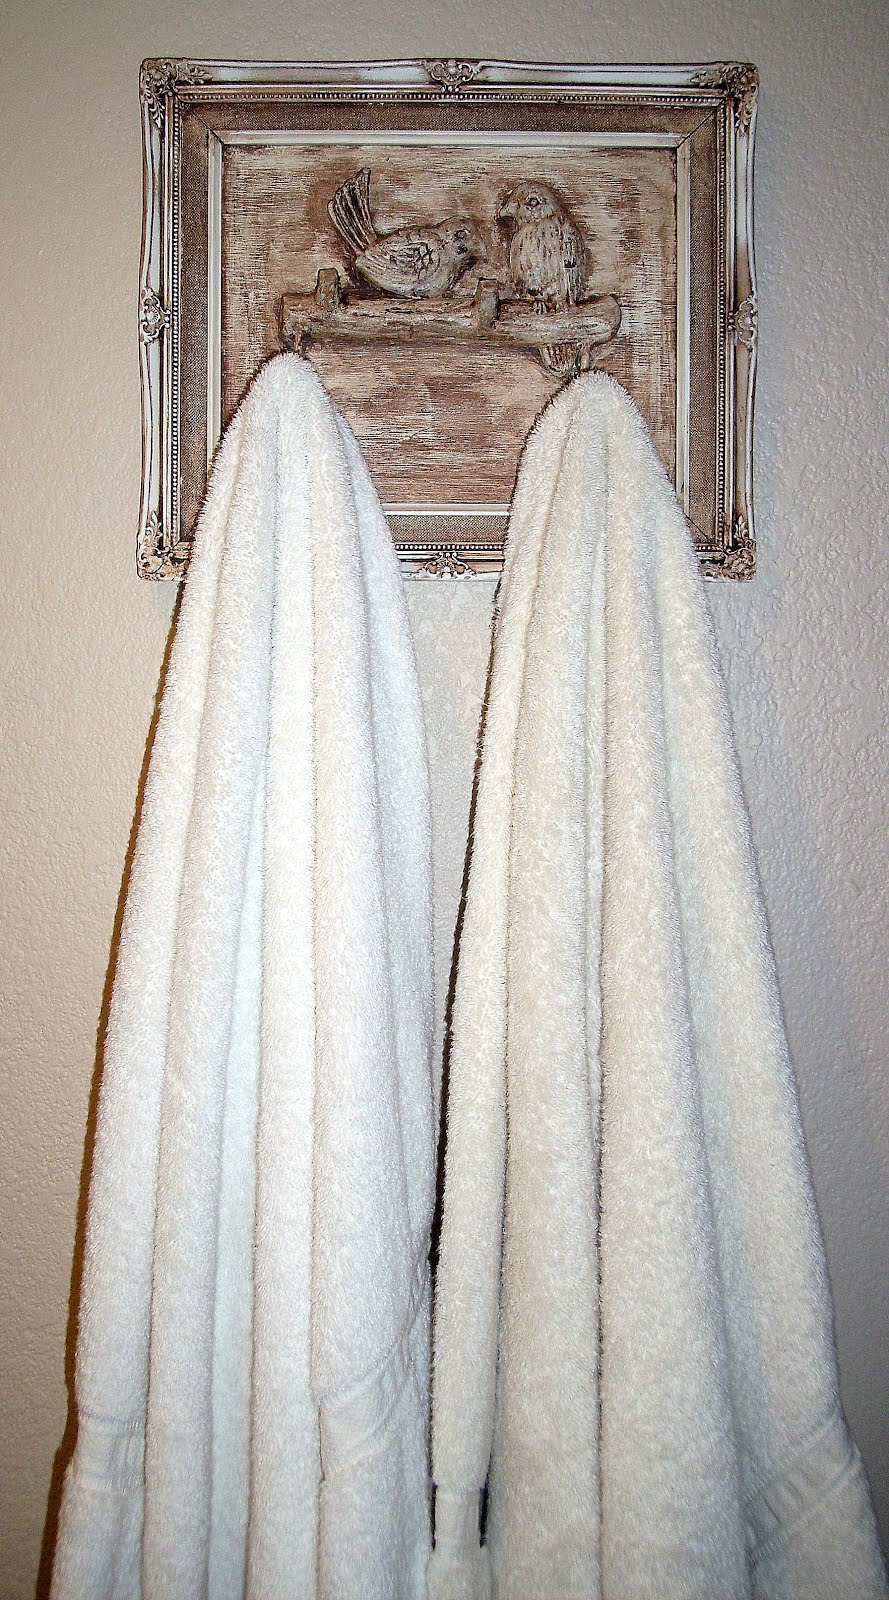
Our new bathroom with the ordinary towel bar (hung at an angle).My Handy Honey said "I know you will do something better than that". So, I gathered some items that I already had and.......
made a "Pretty Bird" towel hanger!

Brown glaze over antique white paint!

Do you like?

And while I had my brown glaze going, I applied some to this awesome old cabinet that a dear friend gave to me recently.


I LOVE the quote hanging on the knob! "The future is as bright as your faith", by Pres. Thomas Monson.

Chelsea gave that to me as a special gift!
~*~ Lynda~*~

Tuesday, February 21, 2012

Felt Fun

Today, I made a little felt book for my daughter using a baby wipes case that was given to me. The case was embellished by someone else, so is very cute on the outside. 


I didn't use it very often, so I turned it into this.


I sewed a layer of quilt batting to two rectangles of felt and hot glued them to both sides of the interior. The quilt batting allows it to have a softer padded surface and prevents the hot glue from seeping through the felt. 


Then Shea helped me decide what colors to make the different felt shapes out of. We had a good time making it and I think it will make a nice quiet toy for her to imagine with. 
I love the simplicity of felt. It doesn't fray and it comes in so many bright colors.

~ Chelsea ~

Monday, February 13, 2012

Valentine's Day Infant Outfit

I love Valentine's Day! Whether there is a special someone or not, it's a wonderful time to show the people in my life that I care. I especially love celebrating with my favorite little people, my kids! Today I made a special outfit for the newest member of my family. I wanted to do something representative of Valentine's Day but also versatile enough to be used other days. In addition, baby legs were on the menu since her little knees are in contact with the floor a lot these days. I found some cute knee-high socks with hearts on them at my local dollar store and that was my inspiration. Using other fabrics from around my house and my friends house (we crafted together today), I whipped something up. I am pleased with how it turned out, but mostly I just think my daughter is adorable! I asked her to model the outfit for me and she obliged (although, she was moving around so much my camera could barely keep up). I hope you like this non-pink Valentine's Day outfit. Maybe you'll want to craft something "love"ly of your own!
<3 Crystal


Sunday, February 12, 2012

My Shabby Bedroom Series (Amateur Art) - Details that Bring it Together

The last thing I did in my bedroom is add the little touches that help me start and end my day on a good note. A large sign above my bed helps me remember to be AWESOME. I hung that up after my recent divorce and it is a good reminder. I made the sign with a $0.51 piece of wood, the yellow ooops paint, a sander, white contact paper that I had on hand, and Chelsea's cool Silhouette machine. It was one of the signs from the boutique that I decided to keep. I found out later that it's actually a quote from "How I Met Your Mother." Wherever it came from, it pushes me along on harder days.
The bird pictures are ones I found online and simply printed with colored ink. I actually took great effort to find birds that are native to this area. It helps me remember the beauty that surrounds me. I like that they look like they're from a birdwatching guide. I enjoy having something pretty to look at that brings happiness.
Other details in the room help to round out the design and fill in the gaps. I like my bedroom and I'm glad that it looks beautiful when it's cleaned up. I hope this little series has inspired you to refresh your room and make it a happy place for you!
<3 Crystal


Saturday, February 11, 2012

My Shabby Bedroom Series (Storage Stands) - Night Stand Stand-in's

A nightstand is kind of a must. Where else are you going to put your watch and phone at the end of the day? My problem with traditional night stands in my bedroom is that there isn't a ton of space and a traditional nightstand does not provide very much function besides being a surface. In my bedroom I decided to make them do double duty. On one side of my bed I have a desk with drawers on either side. This is a place to study, take care of bills, and put things of importance that I need to take care of later. I also have a basket on top with some books within grabbing distance from my bed. Desktop accessories, such as flowers and a vintage perfume spritzer, add character and beauty to the room.
On the other side of the bed is a small dresser with drawers. This can be used to store anything, really. Currently it's housing diapers and wipes for when I don't want to go upstairs to change my baby's bum. On top of the dresser is a lamp for times when the ceiling light is just too much.
Both the desk and the dresser are painted in an "ooops" paint turquoise color that I just love. They are also distressed with the hand sander to add texture and depth. Even though the pieces are not a matching set, they balance the room because they are visually about the same "weight" and they are both the same color. The yellow flowers and the yellow lamp echo each other as well. So you see, a nightstand can be more useful than you might initially think. What furniture could you use as a night stand? Shop your house for pieces that just need a new coat of paint to refresh your room and add storage.
<3 Crystal


Friday, February 10, 2012

My Shabby Bedroom Series (Dandelion Duvet) - Duvet Cover From Flat Sheets

A bed is not complete without a cover. My bedspread is an IKEA duvet. So snuggly, so warm, and so perfectly squishy. I had a couple covers for it, but they were very modern and in this room refresh I was going for a more natural, indie, vintage feel. I wanted something lighter and  more unique. I drooled over some duvet covers from Anthropologie, but  moved past my lusting and into planning what I could do DIY. I got the idea to make a new cover for my duvet by using flat sheets. As it turns out, 2 of IKEA's cheapest flat sheets sewn into a pocket fit a full/queen duvet perfectly. This made my project significantly easier since all my edges were already finished for me! Hooray for being able to be lazy!


This is What I Did:

1. I started with the design on the top. I wanted to have a subtle nature-inspired pattern. I found inspiration in some eyelet lace ribbon that I had. It was $1 for the entire spool at my favorite discount fabric place. I liked that it was just a bit creamier than the natural white sheets. I laid out the sheet on my living room floor and I formed the lace ribbon it into a loose pattern of dandelions in seed. I made three large "dandelions" coming from one side of the sheet. I didn't want the pattern to be symmetrical and perfect in the least... more loose and flowy.

2. Once I got the pattern where I wanted it, I started forming it better using pins along the way to hold the ribbon in place. I used a lot of pins. This was tedious, but very necessary.

3. I then sewed the ribbon onto my sheet with my sewing machine. This was incredibly difficult with the machine I have. I think a quilters machine would have worked much better. But, because I had pinned the ribbon, I was able to accomplish this step without too many tears and no swearing (actually... I don't ever swear). I just went slowly and pretended to be a patient person temporarily.

4. After the top of my duvet cover was complete, I sewed the second sheet on top with right sides together. I left a large portion of one side open to be able to put the duvet inside.

5. The last step was to turn the cover right side out and stick it on my duvet.

I'm pleased that it is very neutral while having just the right amount of design to compliment the other features in the room.  You could use this method with any sheet. There are so many beautiful sheets out there... think of them all as options for a duvet cover, a curtain, or fabric for any project. They are usually a very reasonable price per yard. Have fun!

<3 Crystal

Thursday, February 9, 2012

My Shabby Bedroom Series (Sweet Seat) - A Reupholstered Chair

I believe every bedroom should have at least one good comfortable seat. You don't have to have a deluxe master suite to accommodate a sweet little niche for reading, holding your baby, or sitting to put on those boots that you have to tug on just a little bit. I wanted a place for things like this, but upholstered furniture is not cheap.... and, if you haven't noticed, I am. Also much of what can be bought is boring or bulgy-looking (in my opinion). When I stumbled upon this chair marked for $1 at the thrift store, I got an idea. An awful idea. My brain got a wonderful awful idea. (no idea why I just started quoting "The Grinch...." just now).

(Before)

Anyway, I decided to repaint and reupholster it. I looked online for advice and I did find a good re-upholstery article HERE. It gave me courage. I busted out my heavy duty stapler. Then using the chair's old fabric as pattern pieces, I did my best. One good thing I did was take detailed notes as I deconstructed the chair. This helped me put the pieces back in the correct order. I learned that all those extra bumps of fabric actually needed to be there... it's not going to be a straight edge like a clothing pattern. I also learned to avoid buttons until I am taught by a professional. Tufting is no laughing matter. I consider this chair my "training project". Please don't come to my house and look at it closely. It is awful. But I do like sitting in it and I'm excited to use the knowledge I gleaned from this project for other furniture pieces in the future.  

(After)

<3 Crystal

Wednesday, February 8, 2012

Customized Wall Decor!

I am so excited! After 3 years of being in limbo, we have moved into our own home! It's an older home that has been fixed up, but of course, we are going to change a lot of things to make it just the way we like. Our list is a mile and a half long. I'll have an enormous amount of projects to share with you all in the days ahead.


I thought that I would just start with a simple wall arrangement. All of these mirrors and pictures were gold or silver originally. I hand painted them with a nice off-white color. It was some paint that I already had, what a blessing! I know there is more than one way to accomplish home decorating, but I like laying the items out on the floor first and kindof playing around with it to see what feels good to my eyes.


When they are placed on the wall I strive for a well balanced, measured and leveled look. I seem to achieve this best with the help of my husband. He holds them on the wall and I stand back to get a good look. We started by hanging the center larger mirror first. Aren't those two antique English saucers pretty?
I love this vintage, round, lacy mirror! I love it even more with it's new color.


These two hibiscus pictures where an inexpensive purchase from Wal Mart about 4 years ago. I love floral pictures and these had the color of blue I was looking for in the living room.


Here is a close-up view of how I brushed the paint over the detail on the frame of the mirror without getting paint in the nooks and crannies. It helps to make those pretty details stand out more.


Love, ~*~Lynda~*~

My Shabby Bedroom Series (Mood Music) - Record Player Redo

I'm a self-proclaimed music person. Music talks to me in ways that words can't. It can even dictate my thoughts and moods... yeah, I have to be careful about what music I listen to. So, knowing this about myself, I knew I needed something musical in my bedroom. Something to set my mood... whatever it may be. Enter the record player. There is something cozy about that scratchy sound and the warmer tones of a record. And bonus! records are like $0.50 at thrift stores. I decided to buy one of those vintage inspired replica record players... you know... the typical oak one that they sell on the Home Shopping Network during the middle of the night (I don't know... I actually don't even get the Home Shopping Network). I liked the look of the really old phonographs, but I didn't want to invest a lot into restoring one to actual working condition. So I found an already functional cheesy replica on Craigslist for pretty cheap. It was cherry wood, but I wanted to lighten it up. I painted it a color in my paint stash called "Antique White". I thought it was appropriate. After letting it dry, I distressed it with sandpaper and then went over it with a rag that had mahogany stain on it... you know, dirty it up a little. I'm pleased with the end result and love listening to my records while I fold laundry (...oh no, not laundry again. Still need to tackle that pile).

<3 Crystal


Tuesday, February 7, 2012

My Shabby Bedroom Series (Playful Pillows) - Painted Pillow Tutorial

Hello! Happy Tuesday Morning! Do you ever feel like your bedroom is the LAST place on your home's "to do" list? You get to all the rooms that people might see or the places that actually need your attention for sanitation purposes and your poor bedroom gets set on the back seat for a day when you're caught up on everything else. Well, I have learned that those days never come and to have a refreshing place to retire at the end of the day is important. So carve out some time this week to do something to refresh your bedroom (I'll be attempting to get that massive pile of clean clothes put away) and be prepared for a big payoff. Life and our brains function better when we have a beautiful retreat to go to as needed.
I thought I'd show everyone out there in blog land some of the decorating I did to my bedroom to make it fresh and calming. I'm very frugal when it comes to decorating so I did many things by hand. It's not perfect, but I take pride in the fact that I created it myself. I hope you like it too and that you'll feel inspired to get creative in your bedroom decor. I'll post a detail every couple days so come back often. At the end of this series, visit back for a photo of the whole room all together!

First detail: Playful Pillows (With a DIY Tutorial)


When I was planning this room refresh, I visited the Anthropologie website to get ideas (and to remind myself how insanely expensive stuff is there). I saw a cute pillow with a bird on it while I was browsing. It really wasn't anything like these pillows, but it got my own creative juices flowing and I realized that I wanted some feathered friends in my bedroom.
For the bird pillows I shopped my house. I had some pillows that I wasn't using. Plain. Cream. Boring. Pillows. But never fear, I also had paint! Yes, just regular ol' water-based paint. You could use craft paint. I used a paint that I had purchased in the "ooops" section at the hardware store. Here is what I did in 4 steps:

1. I found some bird shapes that I liked online and printed and cut them out in an appropriate size.
2. Then I used a pencil and very lightly traced around the shape directly onto my pillows.
3. After that I started painting! Using a small brush, I filled in the bird shape with my paint and let it dry.
4.  I thought it still needed something else, so I took some beautiful lace details that I had purchased at a discount fabric store on a whim (they were seriously about 10 cents a piece) and hand sewed them to the pillow with matching thread. I thought it added some dimension and boundaries that had been lacking.

The tufted pillow is something that I had found years ago on a super clearance. It was love at first sight and I have held on to it all these years hoping it would someday find a place in my home. It finally has and I have to say I still love it! So, you can see that having a little fun with plain pillows can help you have a custom one-of-a-kind look in your bedroom without being spendy. What kind of pillow will you make?

<3 Crystal

Tuesday, January 24, 2012

Baby Room Progress

I am loving the pinks and oranges in the baby room! And I have had some nap times to get crafty and it feels good. I love being a mom, and I also love time to be creative. 

First and my favorite... My "A" wall art! 


It is not exactly like my original thoughts, but I love the pop that the pink gives to this wall over the crib.
I started by sketching and cutting out my shape from a large piece of cardboard we had kicking around the house. Then, I taped the cardboard up to the wall above the crib and traced it onto the wall using a pencil.


Then, I painted it on with a medium sized foam brush. It was easier than I thought it would be.
I cut out the "A" from one of my coordinating fabrics for the room and stuck it to the wall using spray starch. It's an awesome technique that leaves nothing on the wall when you take it down later. 


And here's how the opposite wall has come together.
Photo board shown here.
Felt flowers canvas art technique shown here.
Decoupage picture frame mat shown here.

You'd never know that our internet modem and router are hiding behind the flower frame on the dresser! 


 And now on to my crazy baby mobile made from a spider photo hanger (gifted to us for Christmas) and fabric and paper shapes and ribbons I created. 
I hung it next to the crib where baby can see it, but not over the crib just in case it ever decides to fall!


Can you tell that I am having lots of fun??? 

~ Chelsea ~

Thursday, January 19, 2012

Toy Drum

I gave my little girl a box of musical instruments for Christmas. She, like most toddlers, loves to make noise, and she has always shown a special interest in music. 


As I expected, she loves her music box. 

A few weeks after Christmas, I finally had some time to help her make a simple drum out of a yogurt container to add to her box. It was a fun little project and I enjoyed being creative and making it sparkly and pink just as she requested. 

Our materials: clean yogurt container, drum sticks (dowel pieces), thin paper (we used some awesome wrapping paper from Christmas), paint (for top & bottom of the drum and for the drum sticks), decoupage and scissors. (I mixed my decoupage with some glitter to make the drum sparkly.)


I cut the thin wrapping paper into strips about 3 inches wide and long enough to cover the sides of the drum. Then, I decoupaged the strips on, overlapping them until the sides were covered. 


And the completed sparkly pink drum and drum sticks after waiting not-so-patiently for them to dry!


Now to help the little drummer understand that it's not a good time to drum when baby sister is sleeping! :) 
I brought this upon myself, I guess. 

~ Chelsea ~

Friday, January 13, 2012

House Number

I am excited that I was able to finish a quick project that I started pre-baby. I made a house number plaque to hang near my front door. Our house number is not very visible on our house, so I wanted something large and bold with the number so that people can see it from the street. Also, I don't like all the door-to-door salespeeps we get around here, so just maybe my plea for no soliciting will be noticed and respected. I have hopes, but not high ones! It's worth a shot, and it was a fun little project.


I purchased the wood plaque at Joanns using a 50% off coupon so it was about $5. I painted it with the brown paint we have for the accents on our house. Then I used my silhouette machine to cut out the numbers and letters in white contact paper. I placed them on the painted surface and then painted on a finishing coat of decoupage for durability for being outside. I hammered in a sawtooth hanger on the back to hang it up. 


Even though I didn't get the letters perfectly strait (and because I'm a perfectionist that slightly bothers me), I still love how it turned out and how it looks on my front porch. 

~ Chelsea ~

Friday, January 6, 2012

Decorating Dilemma

As I type this post, my little 5-week-old girl sits staring up at me from my lap, with the hiccups. 

So, I have this problem as of the last few weeks. I have this itch that can't be scratched. I have an adorable newborn in my house now and so I spend a lot of time bouncing and doing laps around the house in the soothing-to-sleep process for this little spazzy bundle. While I walk around my house, I think of fun new decorations that I could make. The two rooms that I am wanting to decorate the most right now are the baby room and the family room. The baby room has been a slow work in progress, and mainly because I haven't loved any of my ideas, until recently. And the family room has been neutral brown, black and white for too long and I'm ready for something more brave and bright. With all my time to think, I have some great ideas now of what I am wanting to make and change, but here's the problem... I have no time to be a creator! So, for now all the ideas are floating around in my head and I imagine them on the walls and shelves as I do my laps around the house or sit rocking my little one. 

Here are some things that I want to do...

Baby Room: 
- Hanging photo and pink/orange shapes mobile in corner of the room using a spider picture hanger.
- Find some interesting wall hanging that can complete the grouping on the futon wall. Preferably something with dimension.
- Bring some color to the window. I have an idea for a colorful valence. 
- Large "A" fabric art above the crib. I have a lot of fabrics that coordinate with the colors in her room that I would like to use for this. Something to this effect, but with more fun patterns. The circles represent twisted flowers made from different fabrics. 


Family Room:
- Turquoise may be the new color to spice up this large front room. I know the husband likes turquoise, and I'm definitely into it these days. Maybe a few different shades of turquoise. 
- Add family photos on entertainment center, I'm trying to think of a creative way to display them other than frames.
- Couch pillows
- Coordinating dining room table center piece to tie the kitchen and family room colors together.
- Quote or art hanging near front door


Hopefully, me writing out some of these ideas is the first step to getting some of them done! I hope to show you some creations soon. But for now, I'll just keep perfecting them in my head as I enjoy my little bundle! :)

~ Chelsea ~

Friday, December 23, 2011

Simple Christmas Tree Ornament

My mom made this beautiful ornament for my tree this year. 


She used the metal top of a frozen juice concentrate container, painted it, drilled a hole and added the ribbon hanger and the silhouette nativity. I used my Silhouette machine (craft cutter) to cut the white contact paper into the detailed nativity shape. 
Contact paper is a great (and cheap) alternative to using vinyl for many projects when using a craft cutter. 
This ornament is simple and a great reminder of who we are celebrating!


Merry Christmas!

~ Chelsea ~

Monday, December 19, 2011

Merry Christmas To All

I really love the Christmas season! Everything about it is joyous!We have had this nativity profile for many years. Rod, my Handy Honey, simply cut it out of plywood, made some legs on the back to hold it up and I painted it white. It has it's own spotlight, because after all, Christ's birth is the best part of Christmas. Above is Chelsea's lovely Christmas tree. Her awesome little helper rearranges it once in awhile! The beaded pears & apples are some items that we used at her wedding reception so, they are extra special.

Our Christmas tree has so many ornaments that I don't even put them all on. Years ago I used to have 2 trees, one for the kids to decorate (which I always loved) and a fancy one that coordinated with the living room colors. Almost every year I buy or make an ornament that has the nativity on it. I make sure to place them on the lower half of the tree so our Grandcuties can see them and remember what Christmas is really all about.

Living in this smaller home I don't have as many places to decorate, but our antique buffet is a great place for all kinds of arrangements.

I love clear glazed ceramics with their off-white color. I have made some years ago with the help of Rod's Grandmother, but this pretty piece of Joseph, Mary, and Jesus came from a thrift store!

One more picture of the front of our home with the beautiful white lights!

With Love, Lynda

Thursday, December 15, 2011

Baby Room

Slowly I am getting decorations gathered and made for my new little baby girl's room.

This fabric inspired the colors and theme of the room. I got this little piece of flannel fabric in the remnant section at Joann's a long time ago and unfortunately, it is no longer available. With the help and instruction of a good friend, I crocheted the edging around the fabric to make it a little blanket.
I love the deep and bright colors.


So, all the colors in this blanket will be included in the decorations for the room.

My mom, Lynda, made a vibrant picture frame mat and gave it to us with a beautiful white frame to include in the baby room decor. 


I love how it looks! And it is incredible to note that all the great pinks and oranges came from a variety of ads that my mom collected. She cut them out to perfectly cover the mat and then mod-podged over it all for a smooth final coat. 
I made the simple "I am a Child of God" center.

Once I get all the wall decorations made and up, I'll be sure to post how it all comes together.

~ Chelsea ~